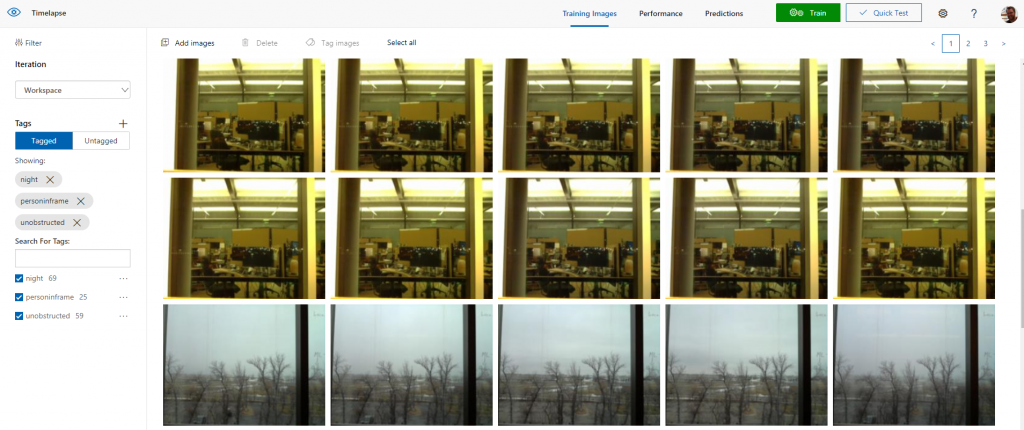
This winter I started a timelapse just pointed out my window to see the transition from the snowy cold of the North Dakota winter to the pleasant green of summer. The problem being I set it up on my desk and several people walk by. Also, you can’t see out the window at night because the lights stay on and all you see is a reflection.
There are about 19,000 pictures it took in total over 67 days and I didn’t feel like manually digging through them. So I created an Azure Custom Vision model to use offline with Python. This allowed me to take out all my unwanted pictures in around 20 minutes instead of the process being nearly impossible.
First I created a General Classification project using the Compact model so that we could export it. I also chose the “basic platforms” option because I wanted to use Tensorflow.
I uploaded and classified around 150 images, this is way more than needed but I had a lot of source material and wanted to make it as accurate as possible. I manually tagged these either unobstructed, night, or personinframe.

After training and exporting the model I used the article Tutorial: Run TensorFlow model in Python to build a script to run on an Azure VM. You can see my script below, I didn’t do much modification of the tutorial script beyond adding an argument for the directory so that I could run multiple copies against multiple directories at once.
import tensorflow as tf
import os
import sys
from shutil import copy

from PIL import Image
import numpy as np
import cv2

def convert_to_opencv(image):
    # RGB -> BGR conversion is performed as well.
    r,g,b = np.array(image).T
    opencv_image = np.array([b,g,r]).transpose()
    return opencv_image

def crop_center(img,cropx,cropy):
    h, w = img.shape[:2]
    startx = w//2-(cropx//2)
    starty = h//2-(cropy//2)
    return img[starty:starty+cropy, startx:startx+cropx]

def resize_down_to_1600_max_dim(image):
    h, w = image.shape[:2]
    if (h < 1600 and w < 1600):
        return image

    new_size = (1600 * w // h, 1600) if (h > w) else (1600, 1600 * h // w)
    return cv2.resize(image, new_size, interpolation = cv2.INTER_LINEAR)

def resize_to_256_square(image):
    h, w = image.shape[:2]
    return cv2.resize(image, (256, 256), interpolation = cv2.INTER_LINEAR)

def update_orientation(image):
    exif_orientation_tag = 0x0112
    if hasattr(image, '_getexif'):
        exif = image._getexif()
        if (exif != None and exif_orientation_tag in exif):
            orientation = exif.get(exif_orientation_tag, 1)
            # orientation is 1 based, shift to zero based and flip/transpose based on 0-based values
            orientation -= 1
            if orientation >= 4:
                image = image.transpose(Image.TRANSPOSE)
            if orientation == 2 or orientation == 3 or orientation == 6 or orientation == 7:
                image = image.transpose(Image.FLIP_TOP_BOTTOM)
            if orientation == 1 or orientation == 2 or orientation == 5 or orientation == 6:
                image = image.transpose(Image.FLIP_LEFT_RIGHT)
    return image

def main():
    image_dir_arg = sys.argv[1]
    graph_def = tf.GraphDef()
    labels = []

    # These are set to the default names from exported models, update as needed.
    filename = "model.pb"
    labels_filename = "labels.txt"

    # Import the TF graph
    with tf.gfile.GFile(filename, 'rb') as f:
        graph_def.ParseFromString(f.read())
        tf.import_graph_def(graph_def, name='')

    # Create a list of labels.
    with open(labels_filename, 'rt') as lf:
        for l in lf:
            labels.append(l.strip())

    for filename_items in os.listdir(image_dir_arg):
        filename_item = os.fsdecode(filename_items)
        if filename_item.endswith(".jpg"):
            # Load from a file
            imageFile = os.path.join(image_dir_arg, filename_item)
            image = Image.open(imageFile)

            # Update orientation based on EXIF tags, if the file has orientation info.
            image = update_orientation(image)

            # Convert to OpenCV format
            image = convert_to_opencv(image)

            # If the image has either w or h greater than 1600 we resize it down respecting
            # aspect ratio such that the largest dimension is 1600
            image = resize_down_to_1600_max_dim(image)

            # We next get the largest center square
            h, w = image.shape[:2]
            min_dim = min(w,h)
            max_square_image = crop_center(image, min_dim, min_dim)

            # Resize that square down to 256x256
            augmented_image = resize_to_256_square(max_square_image)

            # Get the input size of the model
            with tf.Session() as sess:
                input_tensor_shape = sess.graph.get_tensor_by_name('Placeholder:0').shape.as_list()
            network_input_size = input_tensor_shape[1]

            # Crop the center for the specified network_input_Size
            augmented_image = crop_center(augmented_image, network_input_size, network_input_size)

            # These names are part of the model and cannot be changed.
            output_layer = 'loss:0'
            input_node = 'Placeholder:0'

            with tf.Session() as sess:
                try:
                    prob_tensor = sess.graph.get_tensor_by_name(output_layer)
                    predictions, = sess.run(prob_tensor, {input_node: [augmented_image] })
                except KeyError:
                    print ("Couldn't find classification output layer: " + output_layer + ".")
                    print ("Verify this a model exported from an Object Detection project.")
                    exit(-1)

            # Print the highest probability label
            highest_probability_index = np.argmax(predictions)
            print(imageFile + ' classified as: ' + labels[highest_probability_index])
            if labels[highest_probability_index] == 'unobstructed':
                copy(imageFile, '/mnt/outside/unobstructed/')

if __name__ == '__main__':
    main()
If you have any questions around this I will be more than happy to dig in depth. It is shockingly simple to use and create an advanced model to process tons of pictures and classify them!